Credit Where It Is Due
Cat vs Dog Machine Learning Project - basically my go-to tutorial
Link to the project: here
Demo pics at the end :)
Warning: this is not a tutorial. I am sorry for the lack of explanation, but I will make real
tutorials with good explanations at another time.
So...I'm gonna be taking a machine learning class soon (CS559).
I wanted to make something machine learning-related so that I'm prepared to take on the course material.
Usually, I tend to do this in order to get ahead (since I'm very bad at learning things in real time).
Therefore, I proudly present...
"Cat or Car?"
The idea came from...memes on the internet (I'mma keep it real). However, I was able to put my machine learning concepts to the test. This blog will consist of a concept breakdown, a coding speedrun and...some other things.
Concept Breakdown
Let's start from the beginning. What is machine learning?
Machine learning is a subsection of artificial intelligence that focuses on using random numbers
and mathematical functions to generate some kind "bigger function". For example, let's say that we
want to input an image and have our program tell us if it is a cat or a car. In order to do so, this image
is inputted into this "bigger function" - a black box that is unknown to the user. This black box - realistically -
is just a bunch of random numbers and mathematical functions. That's all that most of these "machine learning models"
are.
This project uses what's called a neural network - a subcategory of machine learning models. Neural networks specifically
use interconnected "nodes" to produce an output. An image is provided below.
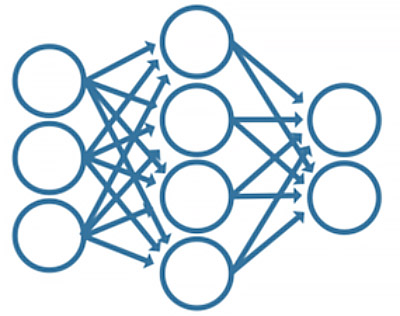
A neural network concept diagram (source)
You can imagine that each circle is a node that contains a number and a weight. A column of circles is known as a layer, and outputs are
calculated layer by layer. Each layer's nodes have connections to nodes of the next layer (in this diagram, those would be the lines). The layer-by-layer
propagation is what's known as forward propagation.
However, the brilliance of the neural network is the effect that the output has on the network. Once an output is created on the last layer,
there is some math that is done to "optimize" the random numbers in all of the layers. This is known as backward propagation. As more information is put through the neural network,
the nodes will optimize themselves to become better at their job. Cool, right?
Now, let's get a bit more specific. In this project, I used a supervised learning model. This basically tells you the way that the backwards propagation works in the model.
"Supervised" means that the neural network's backward propagation is based on predetermined outputs. In this example, I gave the neural network some pictures of cats and cars, it
tried to predict what it was, and then I gave it the actual answer. From there, the neural network can take the difference between my answer and its answer and optimize itself accordingly.
There are many different types of learning models, but they get more complicated...you can do your own research on that.
Okay, here's one last specification - this project uses a convolutional neural network. This just means that the
neural network focuses on computer vision (2D/3D images or videos).
In summary, this project uses a supervised learning model on a convolutional neural network. Lots of fancy words,
but the meaning is not too complicated.
In this project's convolutional neural network, there are only two interesting types of layers that we need to know about: convolutional layers and max pooling layers.
In order to explain these layers, I will assume that you have some knowledge in how images are stored in a computer (RGB colors, pixel values, etc.).
In a convolutional layer, there exists a "kernel" - a small matrix of numbers. This kernel is then multiplied repeatedly over the image as if it is
"slid" across. An image is provided below for an example. There are more complex types of convolution, but...that's too much to cover here.

A convolutional layer (source)
A max pooling layer essentially repeatedly takes a chunk of pixels in an image and finds the "maximum value". This is then saved in a new feature map. An image is provided below for an example.
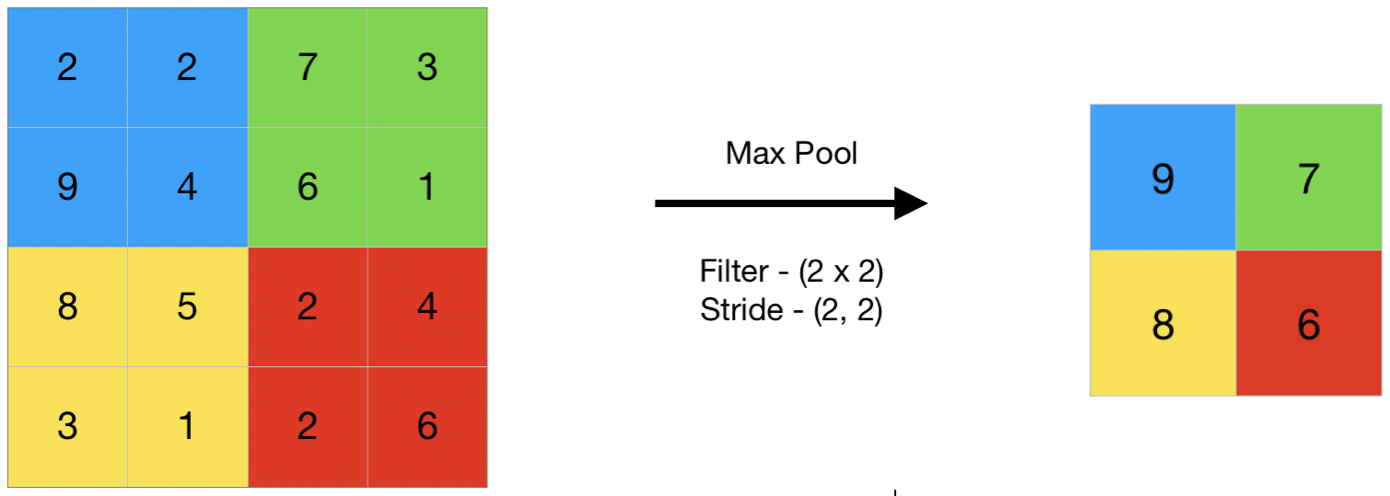
Fig 2 - A max pooling layer layer (source)
Both of these layers specialize in feature extraction - essentially taking what might be important for the network while
dropping most of the non-important details. Both of these layers spit out a smaller image than the one that came in.
The other layer is the standard layer - the one with the nodes and weights. Each node in layer (n + 1) will compute the result:
Variables:
- z is the resulting vector
- v is the vector of input values of each node in the last layer
- w is the vector of weights of each node in the last layer
b is the "bias" - a linear transformation that moves the function up or down in value
So far, all of the calculations in the dense layer have been linear. In order to make this a "neural network" (and not a linear regression model), we need a non-linear function to pass the process through. This is known as an activation function. In my code, I use two activation functions - the rectified linear unit (ReLU) function and the sigmoid function.
ReLU:
Sigmoid:
This all culminates into one number: our output value. In my code, I have suggested that "0" is a cat
and "1" is a car. Of course, you can have a neural network with multiple outputs - you just have to know
how to use them appropriately.
Now...remember when I said that neural network can optimize itself through backward propagation?
Yeah...that math is a little trickier.
Let's start with the dense layer - the basic layer. First, we used a loss function - a function
that gives an absolute measure of difference between the expected answer and the neural network's answer. One
of the examples of a loss function would be mean squared error, as shown in the equation below.
y is the neural network's answer, and yhat is the expected answer.
We then take the average of all of these losses for our training set (n items). Let's call that C.
Note: this is not the loss function that I used. This will be briefly touched upon in the coding section.
Using this average loss, we can use gradients to find the amount by which we should change our values. The basic objective of the gradient in this topic is to find the minimum value of C - our loss function. To do this, we will express the change in C with respect to each weight using the chain rule.
Using multivariable calculus, you can solve the three gradients respectively (I am not going through it, but here is a cool guide on Medium - it basically explains all of what I should be explaining).
After getting these three gradients, you simply change the weights and biases by their respective gradients multiplied to a learning rate α.
The reason we multiply the gradient by a learning rate is to make sure that we don't overstep the minimum that we want to find.
Now...for the convolutional and pooling layers, there is a back propagation function for each of these layers as well.
However, I am not going to go through them as they require a vast amount of linear algebra knowledge (and ngl...I'm currently
too lazy to type it all out with LaTeX). If you are interested,
here
is an amazing article in which all of the desired material is covered. \
Now...let's get into the coding!
The Coding I used Python (specifically Keras) to build this model. The
datasets were taken from the following sources:
I started by cleaning up these files. While there were many folders containing different breeds of cats and cars
(for other purposes, perhaps), I only took the folders that said "cat" and "car" as I had no need to separate different
types of each class. I put all the images into two folders: "data/cats" and "data/cars".
Since the files were randomly named with a bunch of uppercase letters, I wanted to format them. I ran this block of code
to change the file names to "cat_1", "cat_2", "cat_3", etc, etc...
The tqdm library is not essential, but it gives you a cool loading bar, so...yeah.
Next, I wanted to split my dataset into training and testing data. The training data will do all the fancy
math that was mentioned earlier, while the testing data will measure how accurate the neural network is after
training. The metrics of the model's test results will be plotted (as seen later).
The splitfolders library made things pretty easy for me.
After this, I realized that some of the images were not openable (maybe they were corrupted, idk). In
order to fix this so as to not mess up the model, I wrote a block that validated all the images in the new folder,
"aggregated_data".
Now, we get to the more fun part: the model itself!
The model contains convolutional 2D layers (since we are dealing with 2D images) and max pooling layers. The flattening
layer is simply a layer that flattens layer data (in this case, our feature extracted image) into a 1D array.
Interpreting this code requires a little bit of knowledge in Keras, but it should mostly make sense. The "kernel_initializer"
determines the kernel - the sliding matrix that multiplies along the image. The loss function was the rescaling layer rescales
the image to a 32x32 image. More on that later.
The loss function that I used - as mentioned earlier - was not mean squared error since my neural network's output was binary (within 0 or 1).
Because of this, I used the binary crossentropy loss function. This loss function is a bit more complicated, but
here
is a beautiful mathematical analysis! This model architecture uses what's known as one VGG block (3x3 convolutional + 2x2 max pooling). Here is an article with more information on that. \ \ Finally, I made the function that would train and test this model.
In a nutshell, I took the image datasets that I had produced earlier and created a Keras dataset. From there,
I ran the "fit" function - it just automatically does the calculations for you. After it finished, I evaluated the
model using the evaluate() function. These results are plotted, and the results are saved. The JSON version
of this model is the one that is currently deployed on my website.
That's it! I ran the model and got some results. Now, let's talk about the results...
Originally, I tried to rescale the images to 200px by 200px. However, upon running the model, the accuracy
was not looking too hot...
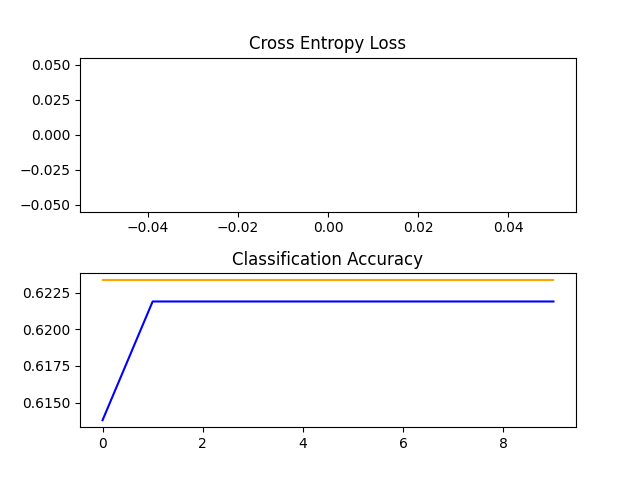
Cross-entropy loss and accuracy of 200px by 200px model
(The blue line is training, and the orange line is testing)
After a lot of deliberation, I figured that it was because the image convolution layers were not working efficiently. Thus, I changed the size of the images to 64px by 64px, and lo and behold...
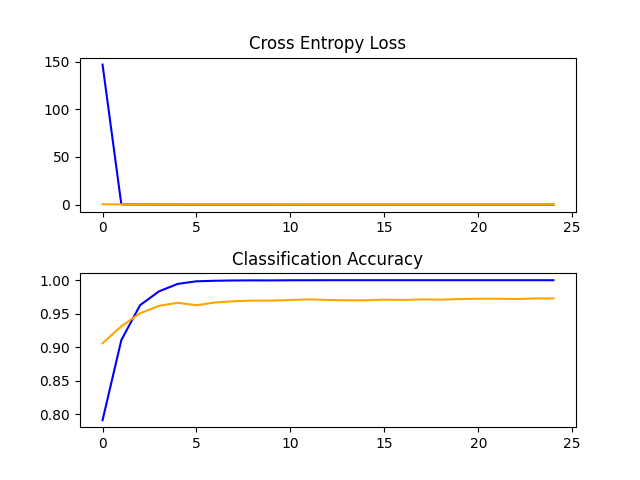
(64px by 64px) Lookin a bit better!
You can actually see the cross entropy loss! (I'm not sure what happened with the first graph)
Finally, I decided to go even smaller - 32px by 32px - just to see what would happen. The results were interesting...
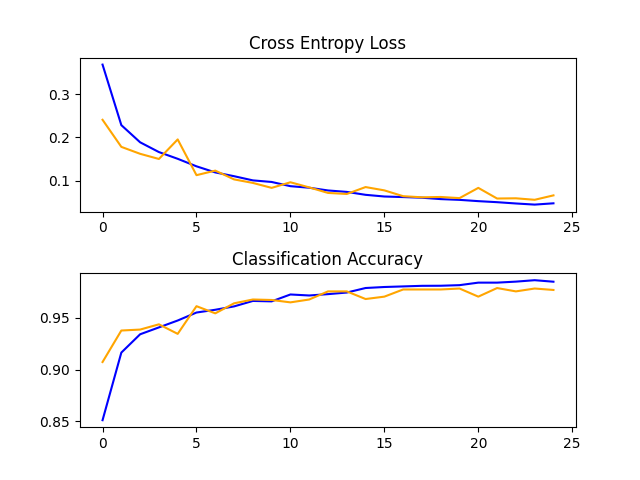
(32px by 32px) Why the graph more erratic doh
Interestingly, the testing loss and accuracy seem to fluctuate more near the beginning (implying a more volatile state), but the results are better than that of the 64px by 64px model. This version of the model is the one that is currently deployed.
Technical Difficulties
Man, it was extremely annoying to get Keras working on my computer. Well, to be more specific...getting
TensorFlow to detect my GPU was hard. However, this was mainly because...I don't know how to read. I did not realize
that tensorflow>=2.10 is not natively supported on Windows.
On top of this, tensorflowjs_converter - the library that I used to convert my model from .h5 to .json - does not
work on Windows. I don't remember how I figured this out, but it definitely took at least half an hour to troubleshoot.
Conclusions?
Overall, this project took approximately 3 days to make. Aside from the MNIST database project, this was the first
completed project that I've done with machine learning, so I had a lot of fun applying my knowledge!
Right now, this model only chooses between cat or car, so if you put something that isn't either of those...it'll take
its best guess...
Once the code is a little more enriching and...not plagiarized(?)...I might push it to GitHub.
I'm sorry if this blog is lacking some pieces here and there - I plan to do more technical blogs in the future,
and I plan to make them a bit more tutorial-oriented. I was too lazy to explain most of the math and coding that
I did. However, future technical blogs should be much more detailed and complete.
Speaking of technical blogs...
You have no idea how long it took me to write this blog.
In one of my next few blogs, I will go over the nightmare of trying to implement LaTeX and code markdown
in my portfolio (and all the new additions). Until then, I'll catch you guys in the next one o7 (please subscribe)
Oh yeah, one more time: here's the link to the project!
Project Pics
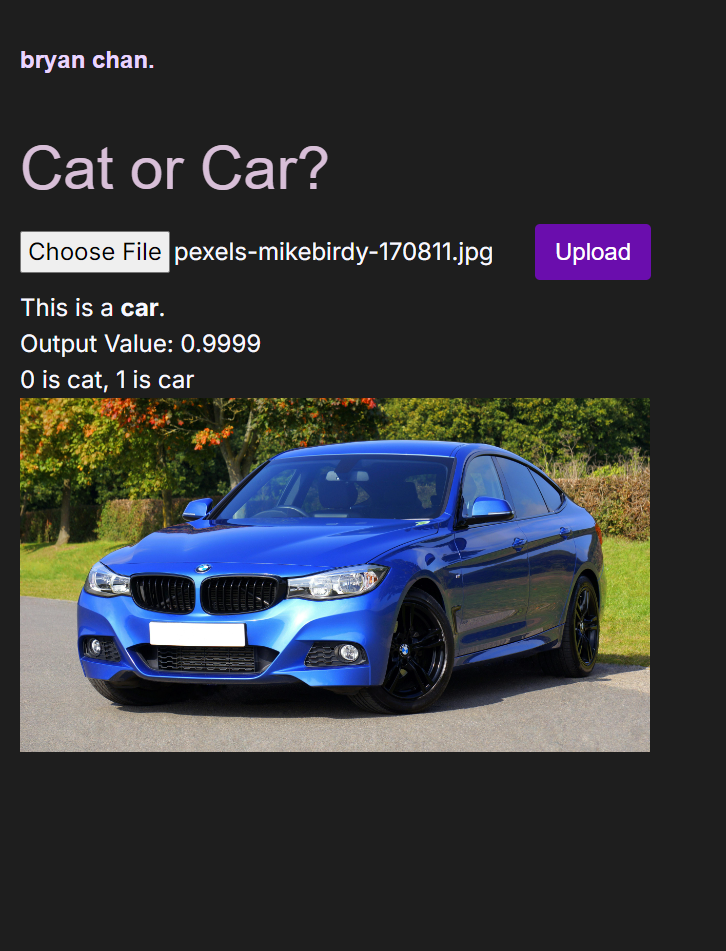
Car parsed successfully!
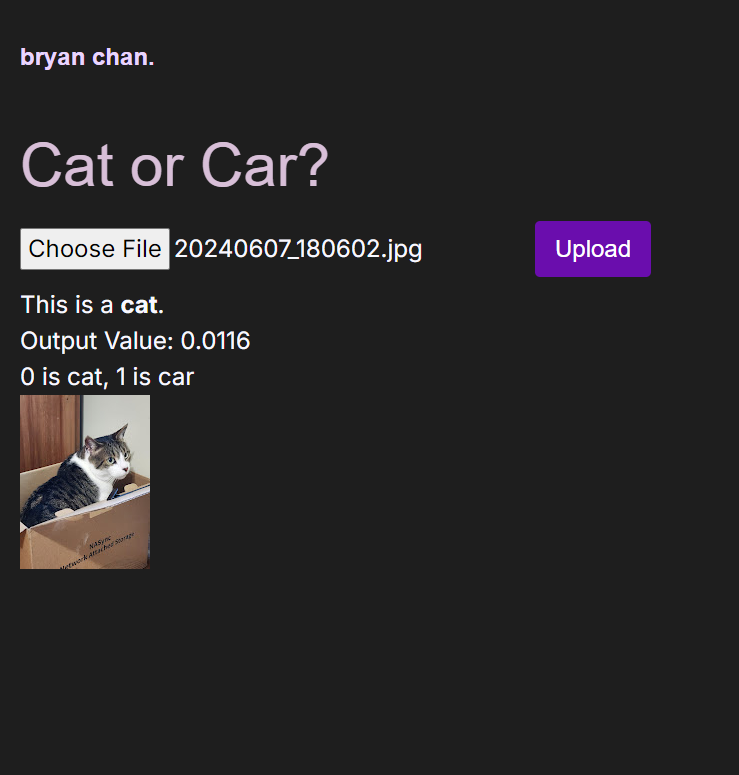
Cat parsed successfully! (fun fact: that's my cat)
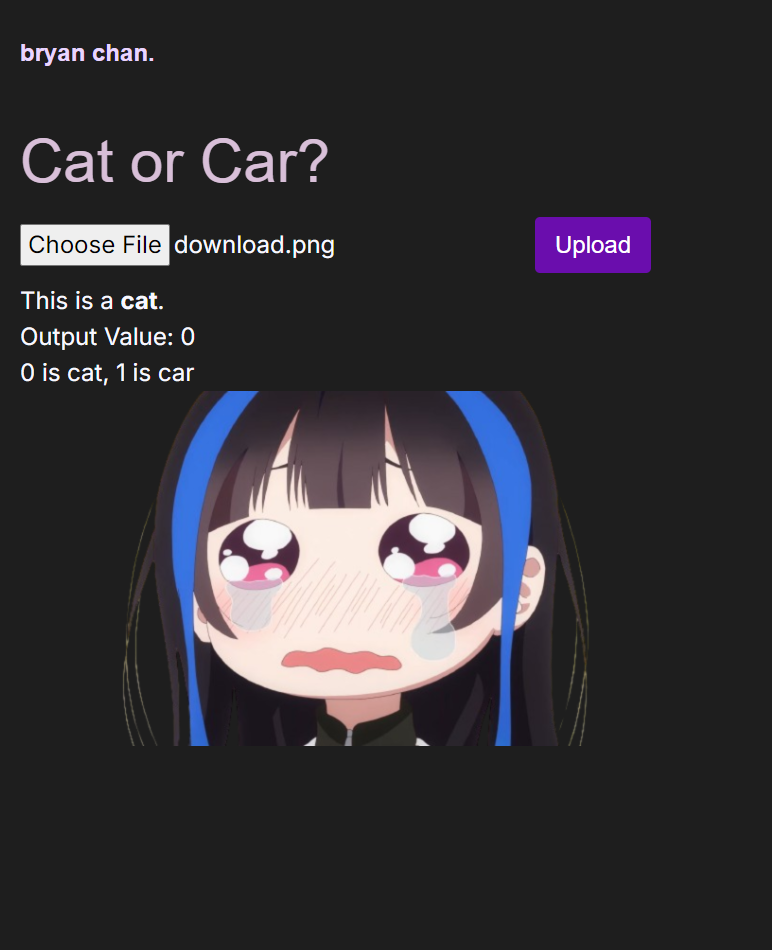
Cat...parsed successfully?