How 2 Torrent With Docker and Servarr
originally created on 2024-12-29
tags: [coding]
- - -
Before we start, I - once again - want to make it very clear that this guide is for educational purposes only.
At no point in this blog will I condone the use of torrents for illegal purposes.
...Okay, let's get started.
This will be a high-level guide on how to set up torrenting with qBittorrent and various Servarr components.
But...Why Are You Writing This?
I heard about torrenting at first in a comedy sketch by Ronny Chieng around
3-4 years ago. At the time, I had no idea what torrenting was. However, I heard that it could be used to download movies and games for free.
Because of this, I looked into it a bit more. I found out that torrenting - fundamentally - was a way to download files from multiple sources at once.
To me, this seemed really cool!
What Is Torrenting?
Torrenting is a way to download files from multiple sources at once. It's typically used for downloading larger files.
Torrenting uses a peer-to-peer (P2P) file sharing protocol. This means that it uses a decentralized network of computers to share files.
The way it works is that you download a small file called a "torrent file". This file contains information about the file you want to download.
When you open this file in a torrent client, the client will connect to multiple sources and download the file in parts from each source (known as "peers").
This can make downloading these large files much faster.
After you have downloaded the file, you can also become a "seeder". This means that you are now hosting the file for others to download.
This way, it makes it easier for other people to download the file!
Users typically upload their torrent files to a torrent index site. These sites are like search engines for torrents.
Pretty cool for a file sharing protocol, right? Well, let's make sure to also know the possible risks and downsides.
- When you are torrenting, other people will be able to see your IP address. This can be a security risk, as people can use this information to track you down.
- It is completely possible to torrent corrupted or malicious files. This is why it is important to use a trusted torrent index site.
- Your Internet Service Provider (ISP) can see that you are torrenting. This can lead to them throttling your internet speed if you use too much bandwidth.
- Torrenting is not illegal in itself. However, it is often used for illegal purposes. This is why it is important to make sure that you are torrenting legally.
Cool, now let's set this stuff up.
Docker Containers Used In This Guide
I used these Docker containers:
- qBittorrentVPN - an open-source torrent client with VPN integration
- The VPN part is important so that you can allow yourself to be guarded from potentially malicious downloads. - Sonarr - a personal video recorder (PVR) for Usenet and BitTorrent users
- Prowlarr - an indexer manager for Usenet and BitTorrent users
If you want a media server, you can also use Jellyfin or
Emby.
The media server does not need to be explicitly connected to the other three containers - it just needs to know what directory to look in for media files.
I personally chose to use Jellyfin.
Setting Up The Containers
The architecture of the containers' persistent storage volumes looks as follows:
This architecture is important and (hopefully) self-explanatory.
It works in tandem with the docker-compose file to make sure that the containers can access the correct directories.
My docker-compose file looks like this:
To give a brief overview of what this file does:
qBittorrentVPN
This container is the torrent client. It is set up to use a VPN (NordVPN in this case) to protect the user from potentially malicious downloads.
In order to use this container, you will need to have a NordVPN account. You can also use other VPN providers, but you will need to change the environment variables accordingly.
The volumes are attached such that qBittorrent will download files to the /data directory.
The config files are stored in the /config directory. The Docker container will look for the OpenVPN config files in its /config/openvpn directory.
The container is set up to use the port 8081 for the webUI. This is because I already have something running on my host machine on port 8080.
Sonarr
This container uses port 8989 for the webUI. This container will communicate with the other two containers.
It will look in the /data directory for downloads (which is also used in qBittorrent) and process them into the /tv directory.
Prowlarr
This container uses port 9696 for the webUI. This container is an indexer manager. It will look in the /config directory for its config files.
Jellyfin
This container uses ports 8096 and 8920 for the webUI. This container is a media server. It will look in the /movies and /tv directories for media files.
Right now, the movies directory is not being used.
In general, three of these containers have a TZ environment variable. This is to set the timezone of the container.
It doesn't matter too much, but it can be useful for logging purposes. Make sure to set it to your timezone.
The Ideal Process
The ideal process for this setup is as follows:
- The user goes onto the Sonarr webUI and adds a series (again, must be legally obtainable) that you want to watch.
- Sonarr asks Prowlarr for the series' indices to search through.
- Sonarr displays results to the user.
- The user selects the series they want to download.
- Sonarr sends the download request to qBittorrent, which then downloads the stuff.
- Sonarr sees the download in the
/datadirectory and processes it to the/tvdirectory. - The media server (Jellyfin) sees the new file in the
/tvdirectory and adds it to the library.
This way, the user can have a seamless experience of downloading and watching stuff.
qBittorrent Configuration
Upon starting qBittorrent and visiting <LAN IP>:8081, you will be greeted with a login screen.
The default username is admin and the default password will be randomly generated. It will be accessible through the file /config/qbittorrent/supervisord.log.
The first thing you will want to do is change the password. You can do this by going to the settings page and changing the password.
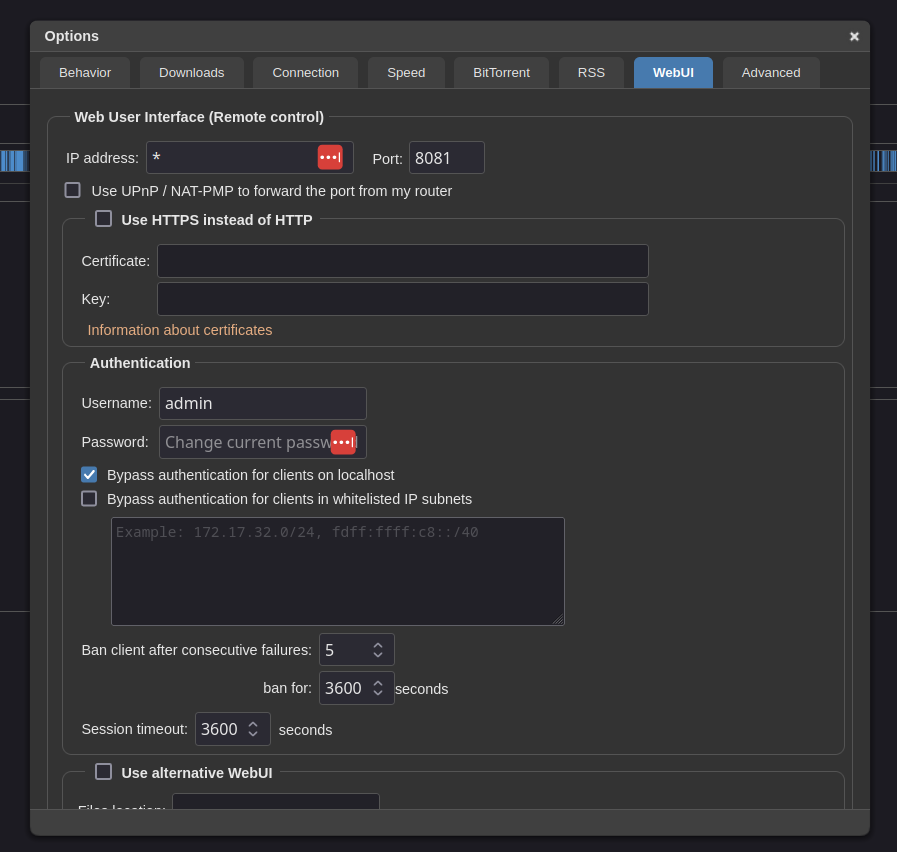
The settings page for qBittorrent
After this, you will want to change the download directory. In this case, we mapped it to /data.
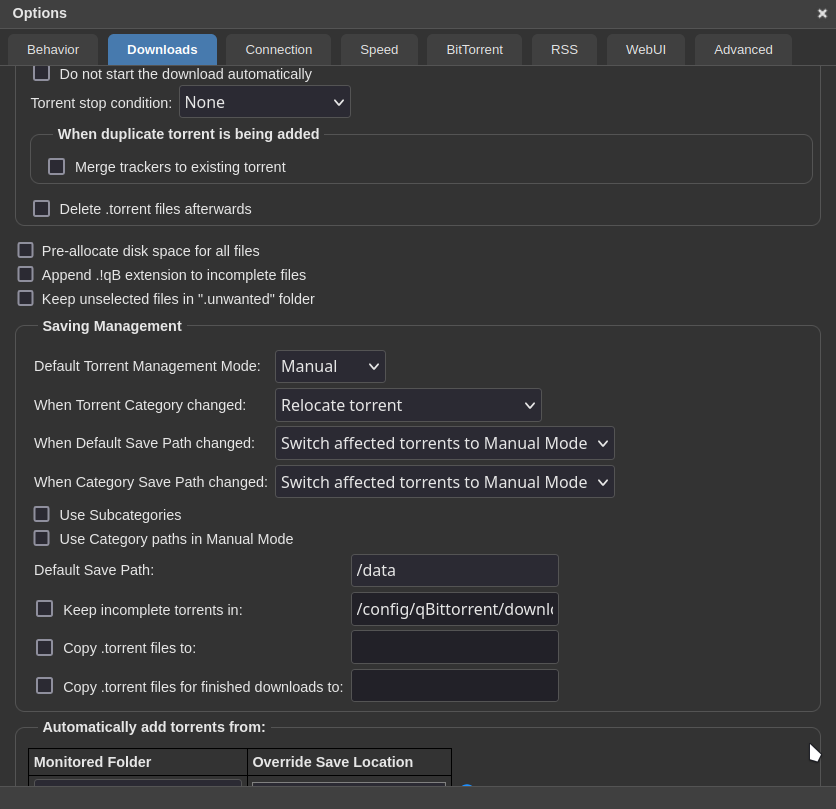
The download directory for qBittorrent
Before you start torrenting anything, you will want to make sure that the VPN is connected.
A simple way to do this is by running curl ifconfig.io in the qBittorrent container.
If the IP address that is returned is not your own, then the VPN is working.
Sonarr and Prowlarr Configuration
We will configure Prowlarr first in order to get the indices for Sonarr.
Visit <LAN IP>:9696, set up your account, and then you can start adding indices using the "Add Indexer" button from the Indexers tab.

The indexers tab in Prowlarr
You can add as many indexers as you want. Just make sure to add ones that are legal and safe.
From here, we need to connect Prowlarr to Sonarr. Navigate to the Settings > Apps tab and add a new application (Sonarr).
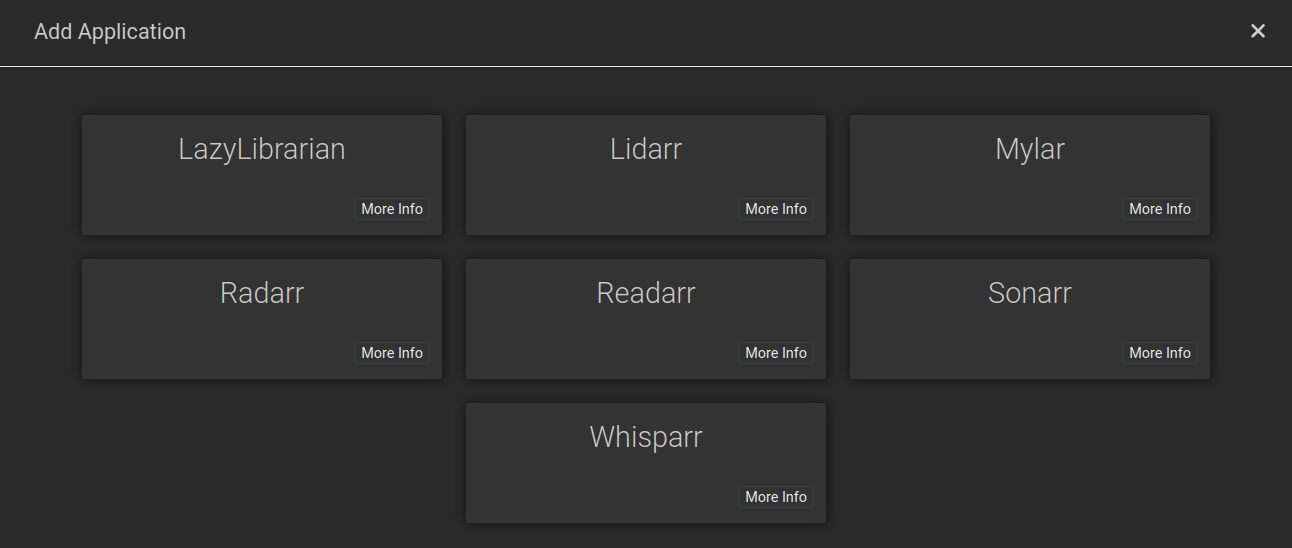
The apps tab in Prowlarr
Upon clicking the Sonarr button, you will be greeted with a page that asks for the both servers' URLs and API key.
In this case, the URLs will be http://prowlarr:9696 and
http://sonarr:8989. The API key can be found in the Sonarr
Settings > General page.
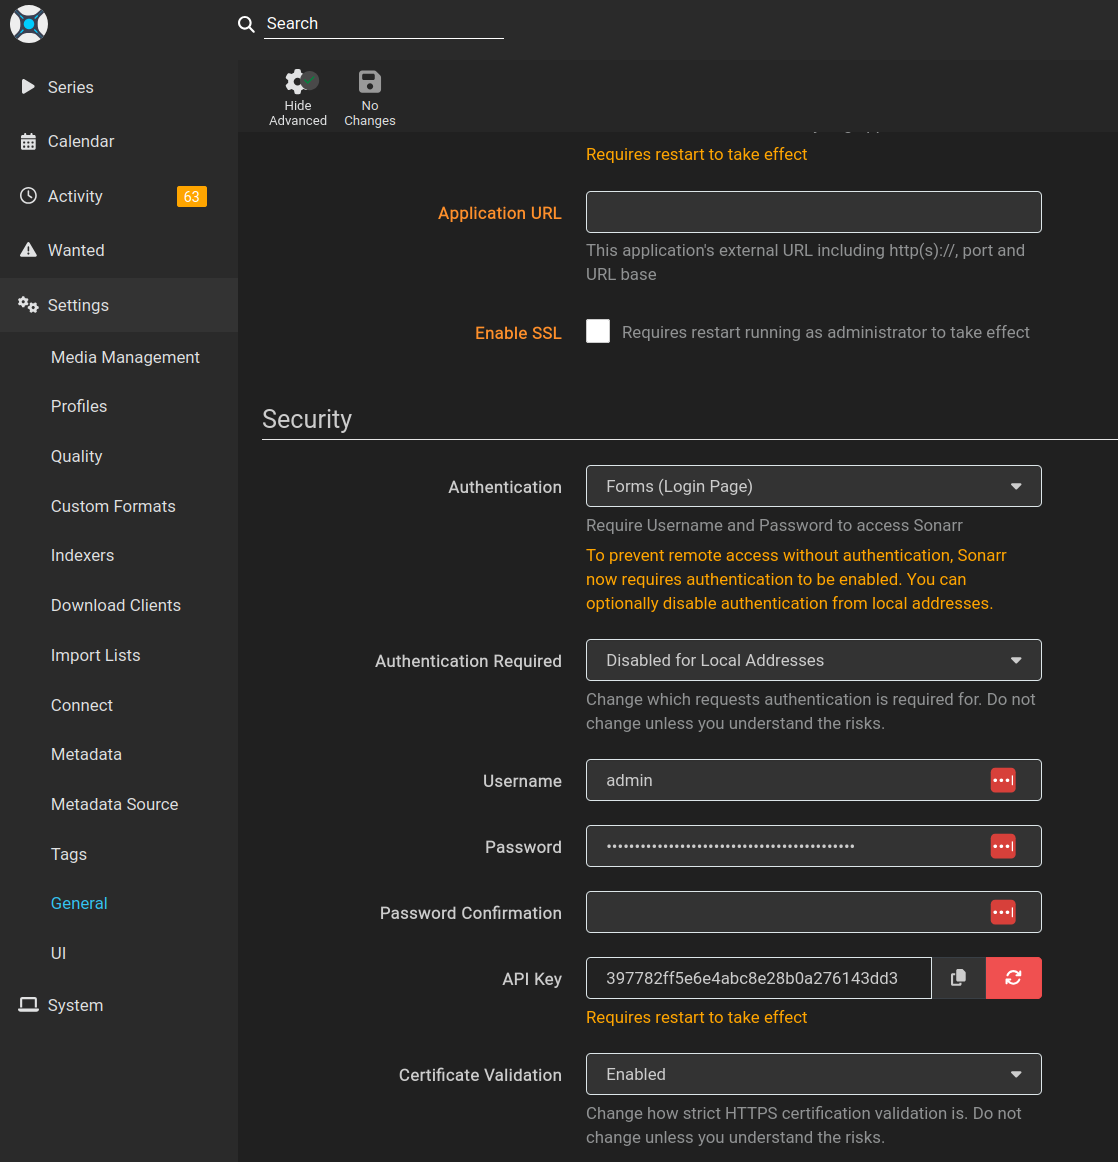
The API key in Sonarr
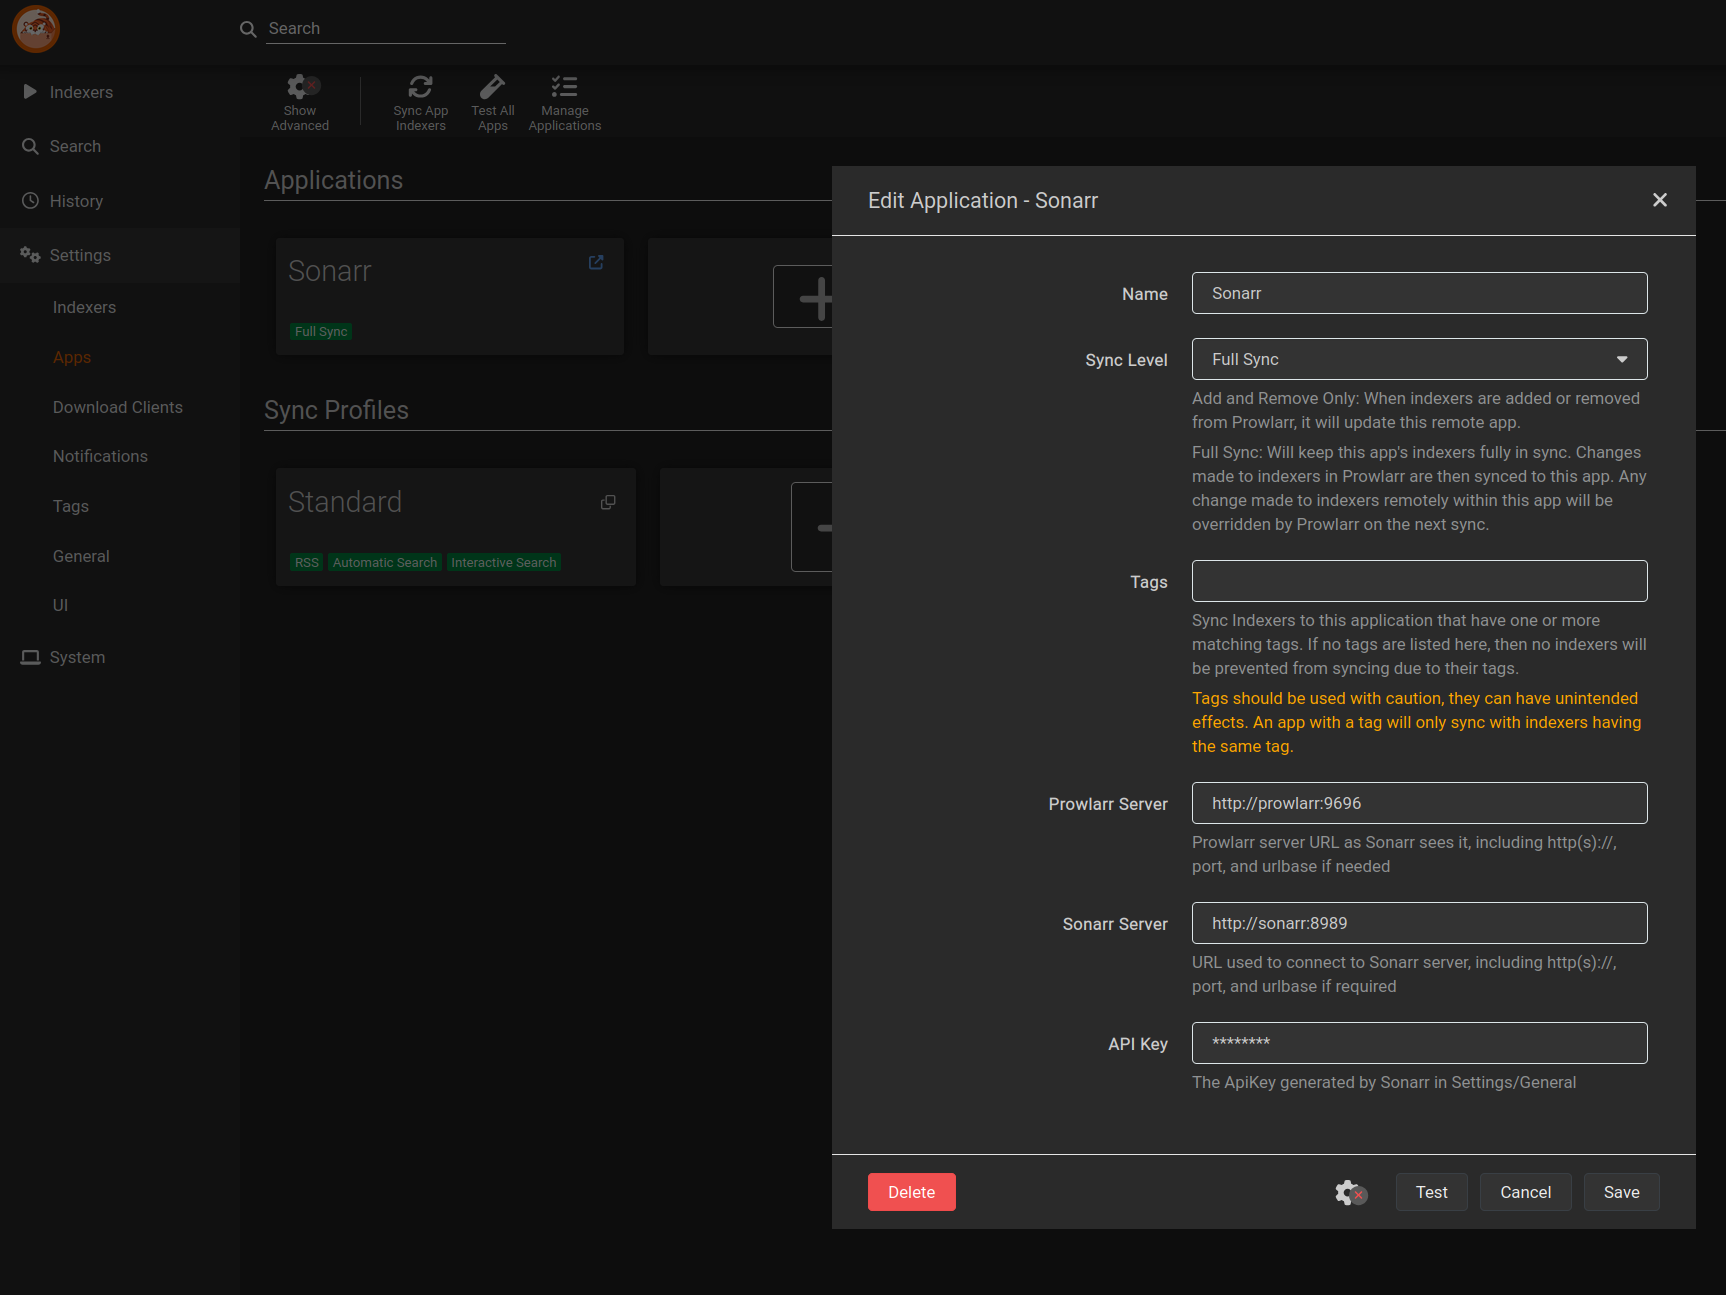
The Sonarr connection page in Prowlarr
After this, we are done with Prowlarr. Now, we move to...
Sonarr Configuration (Pt 2)
Upon starting Sonarr and visiting <LAN IP>:8989, you will have to make an account.
After this, you will be greeted with the Sonarr dashboard. If everything went well with the Prowlarr connection,
you should see the indices that you added in Prowlarr in the Settings > Indexers tab.
From here, we need to connect Sonarr to qBittorrent. Navigate to the
Settings > Download Clients tab and add a new client (qBittorrent).
Use the credentials that you set up in the qBittorrent settings page.
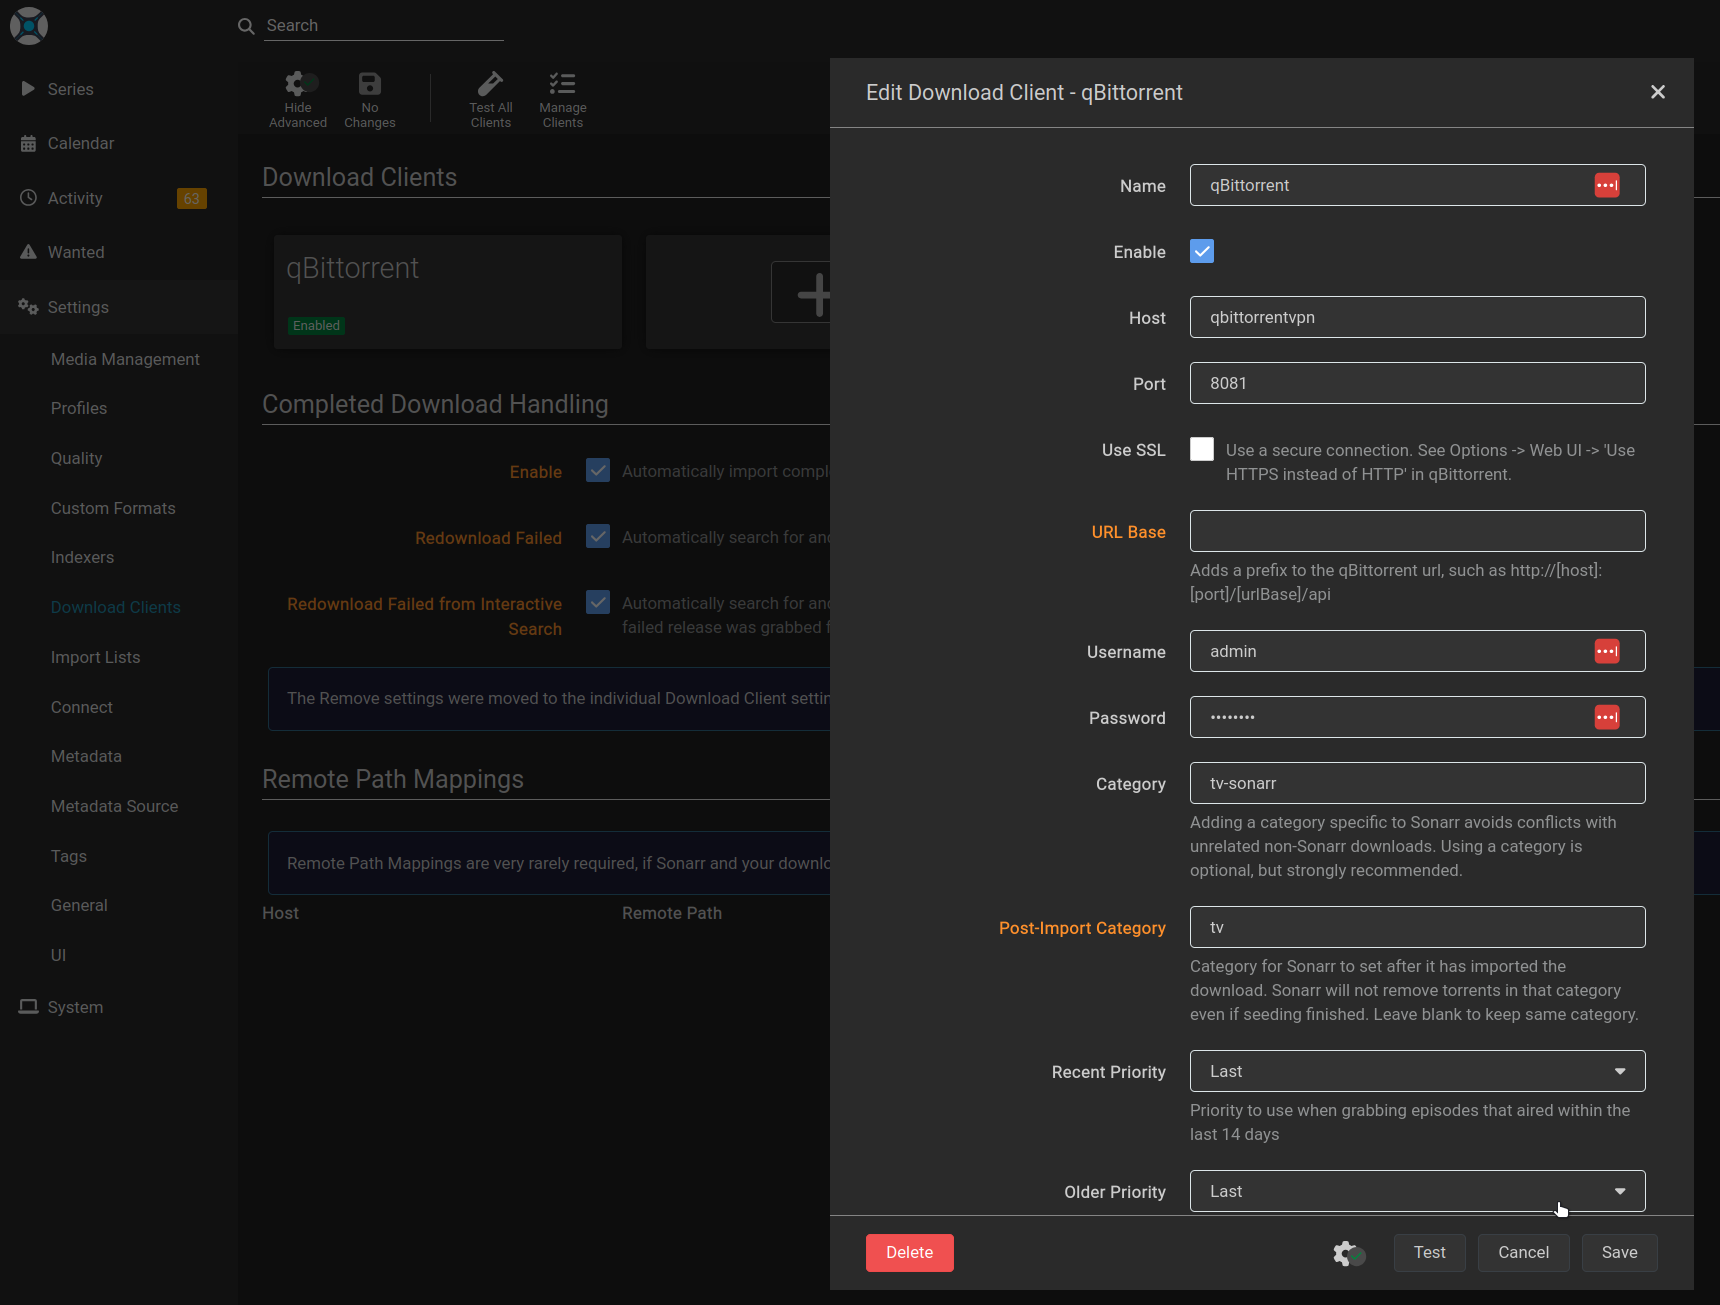
Connecting Sonarr to qBittorrent in Sonarr
Once this is complete, go to the
Settings > Media Management tab and add the /tv directory as the root folder.
This will be the directory that Sonarr will process the downloads to.
That should be everything for Sonarr!
Now, we move to the final step...
Jellyfin Configuration
Upon starting Jellyfin and visiting <LAN IP>:8096, you will have to make an account.
The configuration itself is pretty simple. Just make a new library and point it to the /tv directory.
Now What?
Well, that's it! You should now have a fully functioning partially-automated torrenting setup.
You can now go to Sonarr and add a series. View that series, and click the person-looking icon to view and download torrents.
When the torrents are downloaded, they will be viewable in Jellyfin.
Conclusion
Pretty cool! I hope this guide was helpful.
There are also other things you can do with torrenting. However, I will not be covering them due to legal implications.
As stated before, this guide is for educational purposes only.
If you have any questions (or concerns), feel free to reach out to me via email. I will be happy to help.
Cheers!
Another day another banger
comments
no comments yet. be the first to comment!
please log in to post a comment.