MS-DP100 Self-Learning Course: Module 3
This is my overview/notes for the third module of the Microsoft DP-100 self-learning course.
Module 3! (source)
Module 1 - Running a Training Script as a Command Job
In this module, we get more into production workloads. We want to turn notebooks into scripts to make model training processes easily comparable and reproducible. This includes doing the following steps (cited directly from the course):def main(csv_file):
# read data
df = get_data(csv_file)
# split data
X_train, X_test, y_train, y_test = split_data(df)
# function that reads the data
def get_data(path):
df = pd.read_csv(path)
return df
# function that splits the data
def split_data(df):
X, y = df[['Pregnancies','PlasmaGlucose','DiastolicBloodPressure','TricepsThickness',
'SerumInsulin','BMI','DiabetesPedigree','Age']].values, df['Diabetic'].values
X_train, X_test, y_train, y_test = train_test_split(X, y, test_size=0.30, random_state=0)
return X_train, X_test, y_train, y_test
From here, once your code is refactored, you need to interact with the Azure ML SDK to run the script as a command job. I kinda had a hard time wrapping my head around this, so I had to review the difference between...
from azure.ai.ml import command

# configure job
job = command(
    code="./src",
    command="python train.py --training_data training.csv",
    environment="AzureML-sklearn-0.24-ubuntu18.04-py37-cpu@latest",
    compute="aml-cluster",
    display_name="train-model",
    experiment_name="train-classification-model"
    )
One important part is the command parameter. You are able to pass arguments using Python's argparse library!
This becomes really useful when you want to train a model only slightly differently.
That's honestly about it for this module (or at least in terms of key takeaways). The amount of content in this module was small but vital in real applications.
Module 2: Tracking Model Training with MLflow
In the last module, we introduced the concept of command jobs and scripts. However, because of this, logging becomes slightly more difficult. To fix this, Microsoft implemented MLflow.MLflow is an open-source platform that was originally made by Databricks to manage the machine learning lifecycle, and it provides a way to log metrics, parameters, and artifacts.
MLflow provides both automatic (mlflow.autolog()) and manual (mlflow.log_*()) logging capabilities.
Setting up MLflow is fairly straightforward in the SDK. You need to install two packages:
pip install mlflow
pip install azureml-mlflow
Autologging is supported by a variety of libraries. An image is provided below for reference!
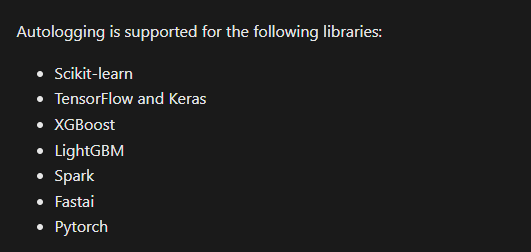
That is - in fact - quite a few (source)
When you want to log manually, you have three basic options:
Metrics that are logged can be viewed in the studio by going to Studio > Experiment Run > Details > Metrics.
The view of these metrics (as well as charts and whatnot) can be edited in the ML Studio.
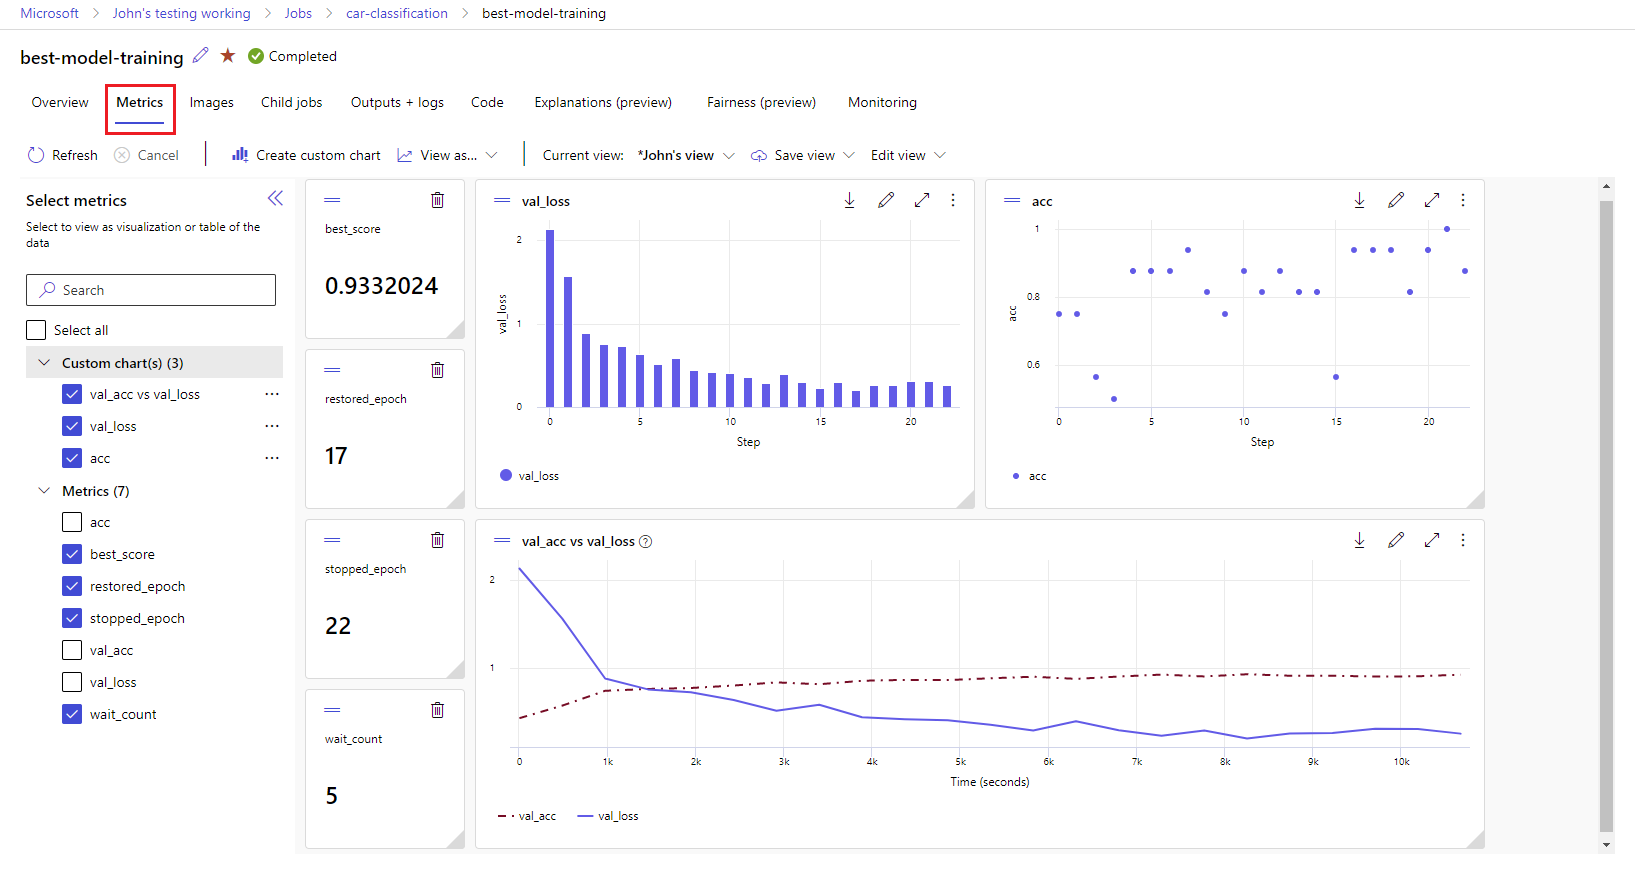
This looks quite fancy! Wowie! (source)
Metrics can also be retrieved in a notebook. First, you have to locate the experiment/run. There are
several ways to do this - you can search the all MLflow experiments using mlflow.search_experiments()
or search by name using mlflow.get_experiment_by_name()`. Once the experiment is retrieved, you can search for runs using mlflow.search_runs(experiment.experiment_id)``.
For more information on how to use these functions, the documentation always comes in handy!
Module 3: Hyperparameter Tuning with Azure
As with any machine learning project, hyperparameter tuning is a crucial step. The term "hyper" is used because these "parameters" cannot be adjusted - like weights and biases - during training. Instead, they are set before the training process begins and remain constant. Some examples of hyperparameters would be...In order to tune these hyperparameters, a validation set (as opposed to a training and testing set) is used. This validation set tests the performance of different hyperparameter combinations and helps to find the best one.
Azure provides a few ways of doing hyperparameter tuning, and they go over it in this module.
Some hyperparameters (such as the number of epochs) are discrete, while others (such as learning rate) are continuous. It is important to note the difference.
The possible hyperparameters that can be selected is called the "search space".
Azure does this by creating classes for each type of hyperparameter. For example, the Choice class is used for discrete hyperparameters, while the Uniform class is used for continuous hyperparameters.
(Tangent: It is very cool that Azure has quantile distributions for discrete variables.)
from azure.ai.ml.sweep import Choice, Normal

command_job_for_sweep = job(
    batch_size=Choice(values=[16, 32, 64]),
    learning_rate=Normal(mu=10, sigma=3),
)
When choosing these hyperparameter combinations, there are a few sampling methods that Azure implements:
When calling a sweep job (the job used for hyperparameter tuning), one of the parameters is sampling_algorithm. There, you can specify the sampling method to use.
Azure also supports early termination for tuning. If a new tuning doesn't result in an improvement, the sweep job can be stopped. This saves computing power!
The sweep job early termination feature has two main parameters:
For example, if you wanted the early termination to - at earliest - be at the fifth trial and wanted to check if early
termination is possible on every other trial, you would set evaluation_interval=2 and delay_evaluation=5.
As for the policies themselves, there are a few policies that Azure implements:
MLflow (from the last module) should be used to track the performance of hyperparameter tuning jobs, and a script should be made for tuning.
I don't want to steal code directly from the website, so I'll just cite the website section itself here. Here is an example of a hyperparameter tuning sweep job.
Module 4: Pipelines
Pipelines. They are pretty important. They can be used to automate/visualize the machine learning lifecycle. By making each step a separate job, you can easily swap out different components (e.g. data preprocessing, model training) without affecting the entire pipeline.Thankfully, Azure uses these.
In order to make a component (a "module" of the pipeline), you need to create a YAML file that defines the component's inputs, outputs, and behavior.
$schema: https://azuremlschemas.azureedge.net/latest/commandComponent.schema.json
name: example
display_name: Example Component!!
version: 1
type: command
inputs:
  input_data:
    type: uri_file
outputs:
  output_data:
    type: uri_file
code: ./src
environment: azureml:AzureML-sklearn-0.24-ubuntu18.04-py37-cpu@latest
command: >-
  python example.py
  --input_data \${{inputs.input_data}}
  --output_data \${{outputs.output_data}}
Loading the component in the Python SDK is fairly simple with the load_component function.
from azure.ai.ml import load_component
parent_dir = ""

loaded_component_example = load_component(source=parent_dir + "./example.yml")
This component can be registered on the Azure ML workspace using the mlclient.components.create_or_update method.
Once we have components for the pipeline, we need to build the pipeline itself. For example (from the Azure website), let's say we have a prep data component and a train model component.
To create a pipeline function, we use the pipeline class.
from azure.ai.ml.dsl import pipeline

@pipeline()
def pipeline_function_name(pipeline_job_input):
    prep_data = loaded_component_prep(input_data=pipeline_job_input)
    train_model = loaded_component_train(training_data=prep_data.outputs.output_data)

    return {
        "pipeline_job_transformed_data": prep_data.outputs.output_data,
        "pipeline_job_trained_model": train_model.outputs.model_output,
    }
This function can then be called and provided with the necessary inputs to the first component.
from azure.ai.ml import Input
from azure.ai.ml.constants import AssetTypes

pipeline_job = pipeline_function_name(
    Input(type=AssetTypes.URI_FILE,
    path="azureml:data:1"
))
If you try printing this pipeline_job, you should see the details of the pipeline job in a YAML format.
To run the pipeline job, you can use the mlclient.jobs.create_or_update function.
It should be noted that the create_or_update notation is used commonly throughout Azure ML.
From here, you can monitor the experiment progress in the ML Studio.
Pipelines can also be scheduled using the jobschedule function.
This is where pipelines becomes especially useful for automation, as you can retrain models
on a recurring basis using a pipeline!
Conclusion!
Overall, I think this third module was...a little "all over the place". Given that the title was "Optimize Model Training", I guess there are quite a few ways to do that, and the module did a good job at highlighting the various techniques that could be used.I really liked that they went heavy into automation and production-level practices. Overall, this was probably my favorite module so far. Maybe it's because I'm scatter-brained and like to take various different topics at a time, but this was fun!
As a note for future reference, I only did the hyperparameter tuning lab and tinkered with basic scheduling on Azure. I would like to revisit and do the other labs if possible!
On a completely different note, I recently started playing ranked League of Legends. I got promoted to Iron 3!! (Still don't know how to play the game...)

I got an S+ too!! :DDD