Gimme My Mail: Self-Hosted Email Server
Hi! It hasn't been too long since my last post, but I made something cool that I wanted to share.
Recently, I have been working on self-hosting my email with a custom domain.
Why Self-Hosted Email?
Currently, my email is kinda long and clunky. Because of this, I wanted to use a custom domain for my email.
My domain provider (Hostway) provides email hosting services, but they are kinda pricey for larger mailboxes.
At the same time, this would be a great opportunity to learn more about email servers!
For these two reasons, I decided that I would try to make my own email server.
While these reasons are pretty nice (+ there's also privacy benefits), I will probably not actually
start using this email server for my daily email until I am sure that it is reliable and secure enough.
Email Servers: SMTP and IMAP/POP3
Email turns out to be a bit complicated.
To send an email, you use a protocol called "Simple Mail Transfer Protocol" (SMTP).
SMTP is used to send your email to a mail server. This server will do a DNS translation to turn
domain names into IP addresses. For example, if I am sending an email to "bruh@domain.com",
the SMTP server will look up the mail exchange (MX) record for domain.com to find out which server
handles email for that domain.
From here, the email is relayed from server to server until it reaches the destination mail server.
Once it reaches the destination mail server, the email sits there.
When a client (like Outlook, Gmail, etc.) wants to check mail, it uses either:
- "Internet Message Access Protocol" (IMAP) - view email on the server
- "Post Office Protocol Version 3" (POP3) - download (and delete) email from server
IMAP is generally used more since it allows you to view email on multiple devices without downloading it.
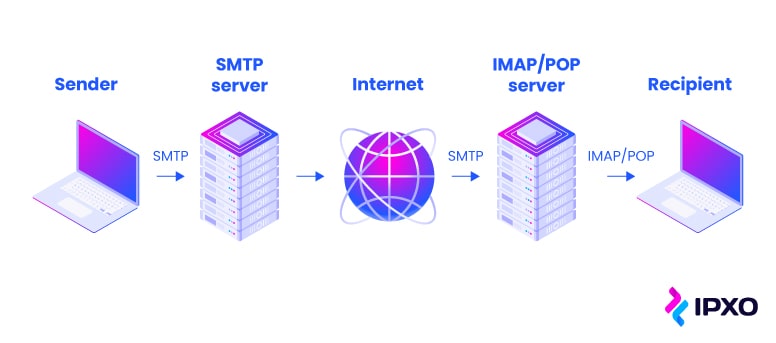
A nice image of email server processing (source)
Now with these protocols, there's a couple terms that you should know:
- Mail User Agent (MUA) - the email client that you use to read and send email (eg. Outlook, Gmail, Thunderbird)
- Mail Transfer Agent (MTA) - the SMTP server that relays email from one server to another (eg. Postfix, Exim)
- Mail Delivery Agent (MDA) - the server that stores and delivers email to the recipient (eg. Dovecot, Courier)
MUAs will use SMTP (MTA) to send mail, and IMAP/POP3 (MDA) to receive mail.
What if you send an email that has CC or BCC?
CC (Carbon Copy) and BCC (Blind Carbon Copy) are just additional fields in the email header.
When you send an email with CC or BCC, the SMTP server will send copies of the email to the additional recipients specified in those fields.
The process of relaying the email to the destination mail servers is the same as with regular emails.
Setting Up My Own Email Server
In order to set up my own email server, I did a few things!
1. Open Ports on My Router
This step is pretty straightforward, I opened ports 25 (SMTP), 587 (SMTP with TLS) and 993 (IMAP with SSL/TLS) on my router to the internal IP address of my NAS.
2. Set Up a Mailserver
I used a Docker container called docker-mailserver (creative name) to set up my mail server.
This container had a bunch of features like spam filtering, antivirus and Postfix support (I will get into Postfix later).
They also have their own MDA (Dovecot) built in!
The ports are mapped to the host machine, and the volumes are used to store mail data, mail state, configuration files and SSL certificates.
But...what is the mailserver.env file? Well, it's the file that contains environment variables.
There's some changes that I had to make to it:
As a note, the SSL certificates were created using an Nginx Proxy Manager container.
This container runs on a different machine, and I just copied the SSL certificates over to my mailserver.
However, I am - at the moment - still trying to find an easy way to automate SSL renewal.
After setting up the container, I created a mailbox for myself using the following command:
3. Add DNS Records
In order for email to be sent and received properly, I had to add some DNS records to my domain. But...why?
There are a few protocols that help with email delivery and preventing spam. These protocols are:
- "Sender Policy Framework" (SPF) - says which mail servers are allowed to send email on behalf of your domain
- "DomainKeys Identified Mail" (DKIM) - adds a signature to verify that the email was sent by an authorized server
- "Domain-based Message Authentication, Reporting & Conformance" (DMARC) - uses SPF and DKIM to determine if an email is legitimate and provides instructions on how to handle emails that fail these checks
In order to reliably send my mail, I need SPF and DKIM records to match correctly. Otherwise, my emails might get marked as spam or rejected.
In order to do this, I need to change DNS records.
The A record points to my mail server, and the MX record tells other mail servers where to send email for my domain.
So in theory, I should be able to send and receive email now...right?
Well...shoot.
Looks like my mail server is having trouble connecting to Gmail's SMTP server.
4. Realizing the Problem: Port 25 Blocking
Turns out...a lot of people had the same idea as me a while ago and started self-hosting email servers.
However, they used this to spam other people.
As a result, most Internet Service Providers (ISPs) block port 25 traffic - especially on residential connections - to prevent spam.
That is why my mail server couldn't connect to Gmail's SMTP server.
So...what can I possibly do about this? This is where the importance of mail transit servers come in.
To solve this problem, I need a relay.
5. Setting Up a SMTP Relay
A SMTP relay is a server that will accept mail from my mail server and then forward it to the destination mail server.
The nice part is that I can use a different port (like 587) to send mail to the relay, and since the relay is on a different network
(that is usually not blocked by ISPs), it can then forward the mail to the destination mail server on port 25.
In order to do this, I bought a cheap Virtual Private Server (VPS) for 7 bucks from Hostinger.
I plan to change this to a more...ethical VPS provider later, but this will do for now.
This VPS will serve as my SMTP relay. (I can also use it for other stuff later too!)
I setup the VPS to have a standard Ubuntu 22.04 installation, and I installed Postfix.
After installing it, I had to configure it to accept mail from my server and forward it.
The important part is that I changed the relayhost to be my server and allowed mail.bryanchan.org in my networks.
I changed the hostname of my VPS to be smtp.bryanchan.org so that it matches the SPF record that I set earlier.
After this, I had to restart Postfix!
6. Testing It Out! (Part 2)
I quickly installed Thunderbird on my computer to test it out.
Connecting my email worked fine! I was able to access the inbox, and I was able to receive mail! However...
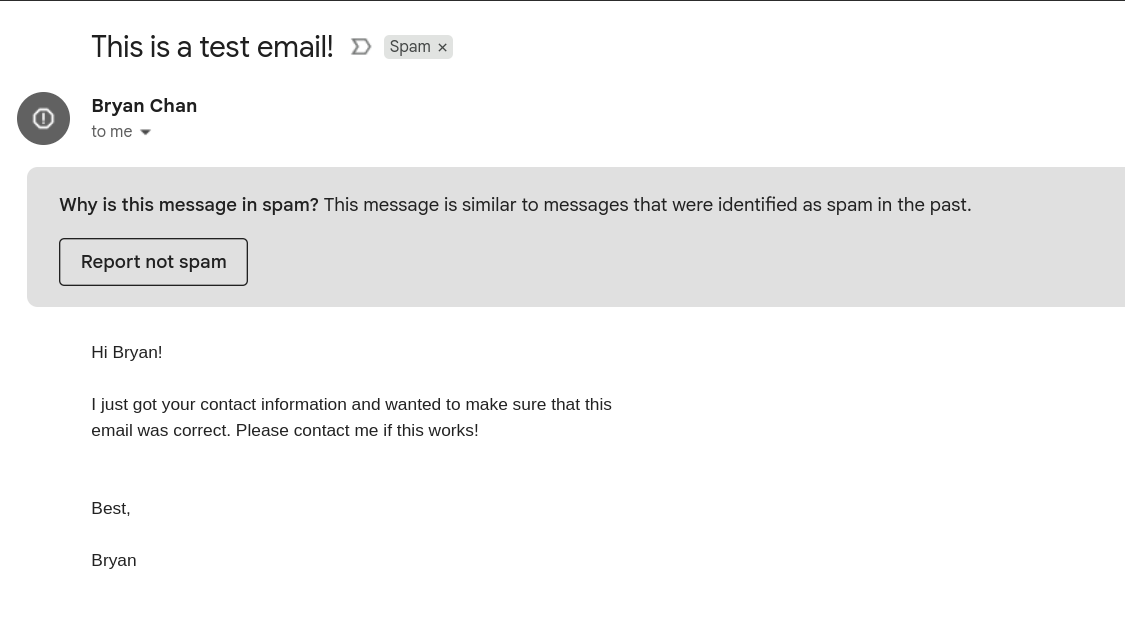
Email got sent to spam folder :(
I dug a bit deeper to find out why! Gmail actually gives you the ability to view the original email along with the tests that it ran on it. Here were the results:
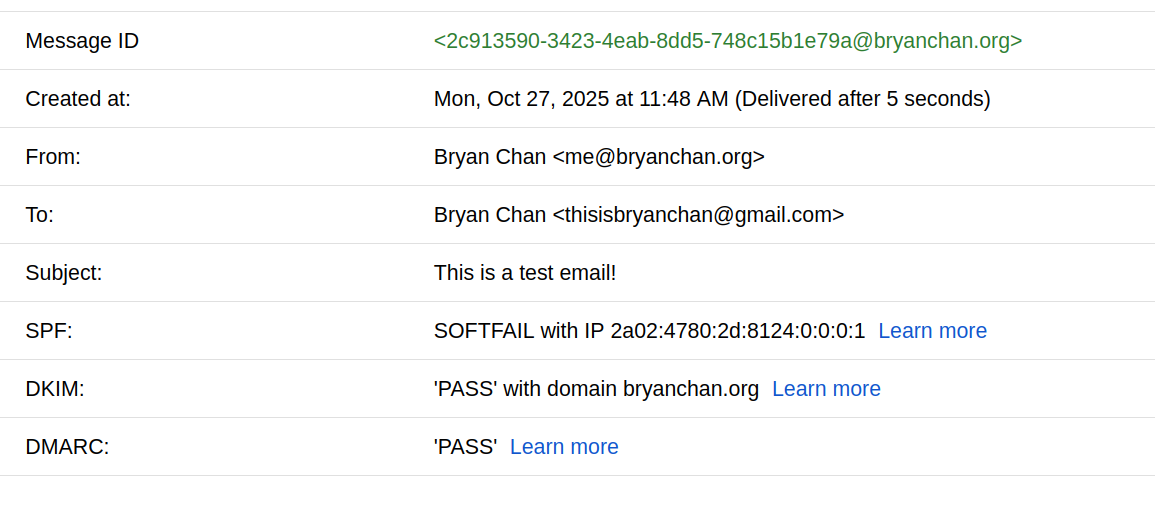
Original email headers
Turns out my SPF was "softfailing". This is because my SPF record did not include my SMTP relay. To fix this, I included the SMTP relay in my SPF record. On top of this, I made a SPF record for the SMTP relay too.
After waiting for DNS propagation, I sent another email...
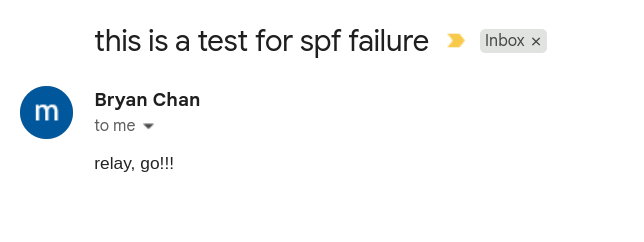
Email successfully delivered to inbox!
Amazing! Email works!
7. What's Next?
Well, I tried sending emails to other providers. In particular, I tried sending emails to my school email. However, the emails got put into spam. Some of the important log parts are shown below.
The important part is the SCL value. SCL stands for "Spam Confidence Level", and it ranges from -1 to 9.
Unfortunately, my emails had an SCL of 5, meaning that they were likely to be spam. This could be because of a few things:
- Content of the email is spammy
- Subject of the email is spammy
- IP address of the SMTP relay is blacklisted/not reputable
I think that the last option is the most probable one. Since I haven't been sending emails, I probably have a more neutral - and thus less reputable - IP address.
To fix this, I plan to send more emails over time to build up a better reputation.
Conclusion
Wrapping things up, I don't intend to use this as a daily email. However, I would like to have a mail server status of some sort running
on my website. I'm not sure how feasible this is at the moment, but I would like to try it in the future.
Next stop?
- Visitor stats?
- Uptime monitoring?
- Job application experience?
- Adding GPG signing to my emails
Not sure yet. Anyways, thanks for reading for now! See you soon :)
(As a note: this post will likely be edited quite a bit within the next few days. It's more of a draft than a final version!)